
Assuming you have one pc/laptop but you need to work with several GitHub accounts.I currently have two GitHub accounts: a personal and a working one. Obviously, my work computer is set up with my work account. I wanted to figure out how to push to GitHub with my personal account whenever I’m working on side projects or doing some practice programming via my work computer.
ConfigurationThe configuration can essentially be broken down into four steps:
- Generate an SSH key for the new account.
- Attach this new key to your GitHub account.
- Register the new key with the SSH agent.
- Create an SSH config file.
1. Generate an SSH key for the new account.
Let’s create a new SSH key, by running the following command in your terminal.
# replace the email with your own github account email
ssh-keygen -t rsa -C "[email protected]"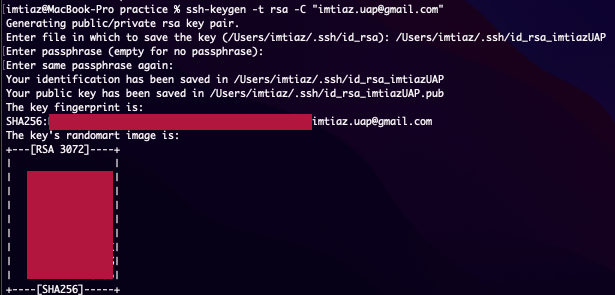
Enter file in which to save the key (/Users/imtiaz/.ssh/id_rsa): /Users/imtiaz/.ssh/id_rsa_imtiazUAP
# At this point, you want to be careful not to overwrite your existing key pair, so for avoiding that name the ssh key file to something new like I did ‘id_rsa_imtiazUAP’
Enter passphrase (empty for no passphrase):
-You can skip it by pressing enter button on your keyboard
Enter same passphrase again:
-You can skip in the same way2. Attach this new key to your GitHub account.
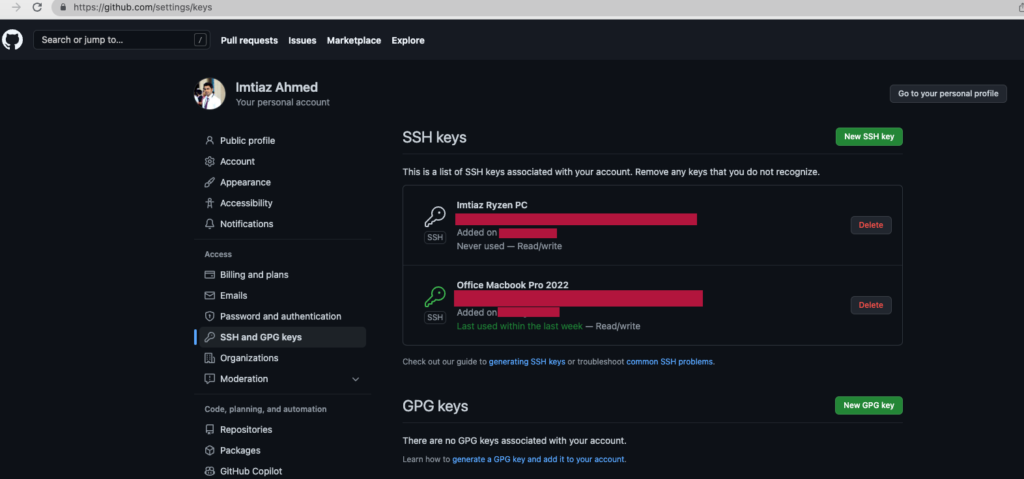
We’ve just created a public key, and now we need to allow our GitHub account to trust it. This allows you to not have to authenticate every time you run a remote command (git push, git pull).Copy the public key from ~/.ssh/id_rsa_imtiazUAP.pub & go to your personal GitHub account.
- Go to Settings.
- From the left side navigation, click SSH and GPG keys.
- Click on New SSH key, name it (it’s a good idea to name it after the computer you’re using it in), and paste the key you previously copied.
- Click Add key.
3. Register the new key with the SSH agent
We now need to register our key with the SSH agent. The SSH agent keeps track of user identity keys and passphrases and works as an additional layer of security.In your terminal, write the command ssh-add and add the path to the files containing your keys. As shown below, we are adding keys for our main account and the second account we just created.
ssh-add ~/.ssh/id_rsa
ssh-add ~/.ssh/id_rsa_uraccount
4. Create an SSH config file
The SSH config file allows us to set configuration rules that will specify when we want to push to our work account versus our personal account. This is done by defining which identity file to use ( the ones we’ve added to our SSH agent ) on which domain.If the file has already been created, it should be at ~/.ssh/config. But by default, it will not exist, so we’ll need to create it by running the command:
touch ~/.ssh/config.Open the config file with vim & put these codes below, you need to replace ‘id_rsa_imtiazUAP’ with your own given name.
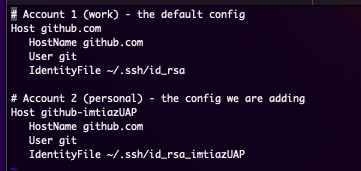
# Account 1 (work) - the default config
Host github.com
   HostName github.com
   User git
   IdentityFile ~/.ssh/id_rsa

# Account 2 (personal) - the config we are adding
Host github-imtiazUAP
   HostName github.com
   User git
   IdentityFile ~/.ssh/id_rsa_imtiazUAP
Save the file & exit from vim.
Now clone one of your personal GitHub profiles repository
# replace imtiazUAP/nest-react-login.git with your own username & project name
git clone [email protected]:imtiazUAP/nest-react-login.git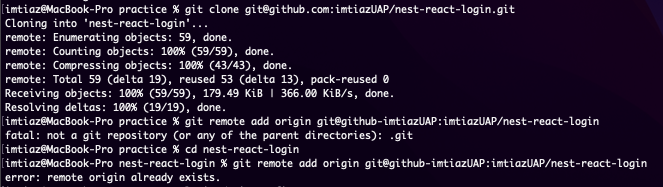
Add remote origin to your repository:
# replace imtiazUAP:imtiazUAP/nest-react-login with your own username & project name
imtiaz@MacBook-Pro nest-react-login % git remote add origin git@github-imtiazUAP:imtiazUAP/nest-react-login
error: remote origin already exists.
So we encountered an error because we are trying to add a slightly modified origin but in this case, as this is an existing repository the origin is already added by default and may be from your other pc when you scaffolded this repository. So the first check if there is already a remote origin is added or not by running the following command:
imtiaz@MacBook-Pro nest-react-login % git config --get remote.origin.url
imtiaz@MacBook-Pro nest-react-login % git remote rm origin
[email protected]:imtiazUAP/nest-react-login.git
So we found already an origin is added from the other pc, let’s remove that first by running:
imtiaz@MacBook-Pro nest-react-login % git remote rm originNow try to add the origin again:
imtiaz@MacBook-Pro nest-react-login % git remote add origin git@github-imtiazUAP:imtiazUAP/nest-react-login
# This time it should work successfully
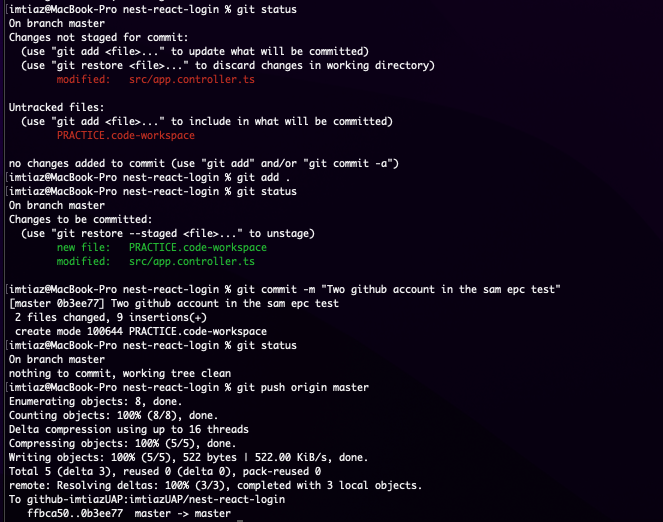
We are all set! Now change your code & commit/push it to your both GitHub account seamlessly.
Hooray!
I followed this blog to learn it: https://betterprogramming.pub/how-to-use-multiple-github-accounts-with-one-computer-c9ba3f851b75
Recent Comments